What is SonarQube?
SonarQube is a code quality scanner that can scan many languages including Java, C# and JavaScript. Although SonarQube code scanner and sonarqube code coverage is very advanced in C#, it seems in the DotNet world the the concept of code quality scannanning and specially SonarQube did not grow to its full potential.
SonarQube scans your code finds code smells, code security breaches and test coverage. Moreover, it has a concept of Quality gate that evaluates new code, and in case it does not pass, SonarQube sends a fail status to your repository so you can block the pull request.
You can run many scenarios with sonarQube: from having it run on docker desktop locally and manually run scanner to set up a pipeline and make it scan your pull request and block it if the quality gate is not passing.
In this article I show you how to get sonarQube community up and running (on ubuntu server and SQL server as database). The next article I teach you how to use a community plugin to get the paid features and how to setup a full pipeline on GitHub to scan your DotNet and Java code.
Sonarqube pricing, does it worth is?
SonarQube has a free version called SonarQube Community. Branch scanning and pull request scanning is not included in community version but there are come 3rd party plugins that help you to get this feature. Read SonarQube Pull Request Scanner + Community for more info.
There is also a cloud based alternative called SonarCloude. It is very good option for opensource (as it is free for opensource) and private repos that want to pay for the service and does not care if the code ends up in a 3rd party database. but it is not always the case.
SonarQube also has Developer, Enterprise and Data Center versions that are commercial and you need to pay for them. I work with both enterprise and community version for different customers and community works as good as the enterprise version (provided that you install the plugin!)
So when it comes to decide which version you want to use, I suggest to consider these :
Go paid when
1- You want fast support.
2- You want to skip all headache of 3rd party plugins might not compatible with all new updates.
3- You can easily afford it! (Yes help the developers)
4- Recently Sonar Source is focusing on Security scanning (it is not yet really up to standards and make lots of false positives)
Go community when
1- Your organization has very limited budget
2- You can maintain the SonarQube internally
3- You feel confident with googling for your problems!
4- You want to evaluate if it is something for your organization in the long run.
Setting up your sonarQube Community server
We are going to need a ubuntu server, I have it on a VM on Azure but you can use Aws , Google Cloud or any could provider you need. You can even use an old laptop as server to press costs down. You just need a ubuntu server!
So use SSH to connect to you ubuntu server (You can use git bash on windows or terminal on Mac)
ssh use-name@your-ip-addressStep 1 : Installing Java on Linux Machine :
SonarQube is written in Java, so you need java runtime to be able to run it.
Check if you already have Java
java -versionIn case of a fresh Ubuntu you probably don’t have java installed. Run command below to install Java Runtime Environment (JRE), which at the time is JRE from OpenJDK 11
sudo apt -y install openjdk-17-jre
# v17 is minimum java version that SonarQube 10 supports
It is a good idea to increase the max virtual memory to avoid the error below :
| ERROR : max virtual memory areas vm.max_map_count [65530] is too low, increase to at least [262144] |
To achieve that we need to append a line( vm.max_map_count=262144 ) to /etc/sysctl.conf. Run following command:
Note: If it is not a fresh linux make sure you don’t have the vm.max_map_count in your /etc/sysctl.conf
sudo /bin/su -c "echo 'vm.max_map_count=262144' >> /etc/sysctl.conf" && sudo sysctl -p
Step 2 : Download and setup SonarQube
It seems Sonar does its best to hide the community build so you have to get to their website (and potentially buy the paid version), It does not seems to be aligned with Open Source culture but anyways…
The easiest way should be to visit their community download page and pick up the latest version there. Here is an example
wget https://binaries.sonarsource.com/Distribution/sonarqube/sonarqube-10.1.0.73491.zipYou are going to download a file named with format sonarqube-x.x.x.xxxxx.zip “ex. sonarqube-10.1.0.73491.zip” (when you get it from GitHub) to your current folder. Lets unzip and copy the file in /opt directory.
Ubuntu does not come with a unzip program lets install unzip first.
sudo apt -y install unzipand unzip the file to /opt/ sonarqube directory (replace x.x.xxxxx with correct version )
sudo unzip x.x.xxxxx.zip -d /opt && sudo mv /opt/sonarqube* /opt/sonarqubeSonarQube cannot run as root, you need to have a normal user with permission to run it. For simplicity, we use the user you are logged in with. So I assume the user you are logged in with is ubuntu , it it is not please make sure you change the command below accordingly (ex. azureuser)!
sudo chown -R ubuntu:ubuntu /opt/sonarqube/Step 3 : Set up SQL database
You can use either PostgreSQL or SQL Server as you database. You can install any of them on your linux instance locally or use and external instance. I am going to have A DTU sql on azure, as it is a pretty much cheap option.
1) Create a database called sonar
Important Note: If you are making an azure database make sure you select COLLATE SQL_Latin1_General_CP1_CS_AS collection from settings. (default is COLLATE SQL_Latin1_General_CP1_CI_AS ).
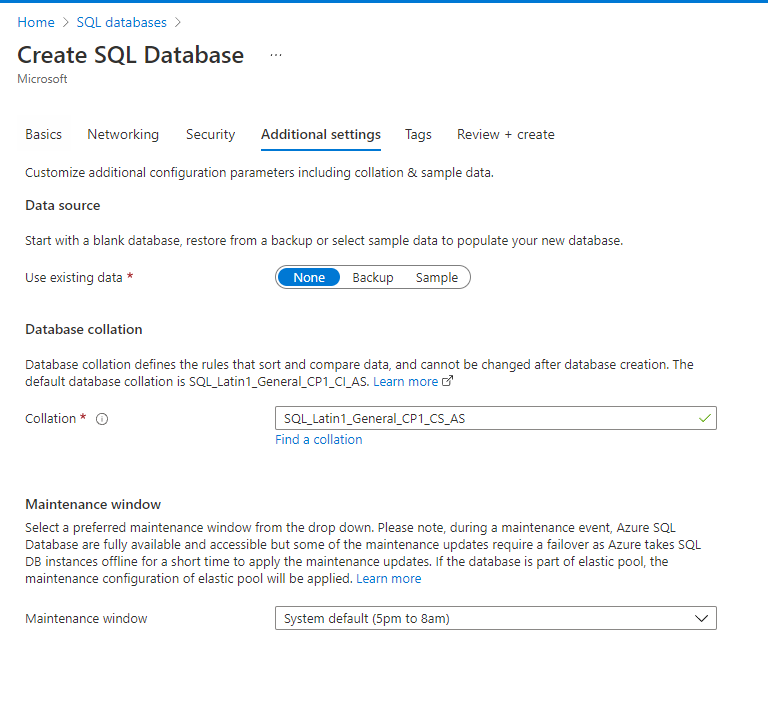
Also if you are doing your database on cloud don’t forget to make sure you and your SonarQube instance can access it.
2) Collation MUST be case-sensitive (CS) and accent-sensitive (AS). Use SQL Server Management Studio (or you favorit tool ) and run these two queries:
--Read Committed Snapshot
ALTER DATABASE sonar SET READ_COMMITTED_SNAPSHOT ON WITH ROLLBACK IMMEDIATE;
You can skip next command step if you have created azure database with correct collection as mentioned above.
--Case sensitive
ALTER DATABASE sonar COLLATE SQL_Latin1_General_CP1_CS_AS
If you want check your above settings you have these queries: (you need SQL_Latin1_General_CP1_CS_AS as response).
SELECT CONVERT (varchar(256), SERVERPROPERTY('collation'));3) Update the connection string: Let’s set the connection string! Open the config file with command below and find the part for SQL Server database (everything is commented by default)
sudo nano /opt/sonarqube/conf/sonar.propertiesadd below to SQL Server section (or if you don’t feel like looking add it to the beginning or end of the file )
sonar.jdbc.url=jdbc:sqlserver://[YOUR SERVER ADDRESS];databaseName=sonar
sonar.jdbc.username=[YOUR USER NAME]
sonar.jdbc.password=[DATABASE PASSWORD]
Save using Ctrl + X and then Y and then Enter
step 3-1: Test Drive!
Ok , at this step you should be able to give your instance a test drive! run following
/opt/sonarqube/bin/linux-x86-64/sonar.sh consoleWait a minute or two and open the database, tables should be populated! If not, you very likely have one of there error:
- You did not run command for read committed snapshots (above)
- your collection is not set to COLLATE SQL_Latin1_General_CP1_CS_AS (above)
- Your connection string is not correct or your database is behind a firewall of some sort!
If your database table is populated at this stage you should be able to access the sonarQube instance form
http://[your_ip_agress]:9000
(make sure you have your firewall open for port 9000 , if you are running on cloud you need to open port 9000 ex . azure networking > inbound security rules, aws security group …)
You are going to see SonarQube is starting (for a fairly long time) give it some time until it is done. Login with admin/admin.
When you are done, please head back to your terminal and press Ctrl+C to exit the process and continue on terminal.
Step 4 : Make a service
Lets make service so sonarqube starts when ever your linux instance is boots up. create a new service in your favorit editor:
sudo nano /etc/systemd/system/sonar.serviceCopy paste below (remember at step 3 we assumed that your current username is ubuntu! If it is not please change the user and group accordingly!
[Unit]
Description=SonarQube service
After=syslog.target network.target

[Service]
Type=forking

ExecStart=/opt/sonarqube/bin/linux-x86-64/sonar.sh start
ExecStop=/opt/sonarqube/bin/linux-x86-64/sonar.sh stop
ExecStatus=/opt/sonarqube/bin/linux-x86-64/sonar.sh status


User=ubuntu
Group=ubuntu
Restart=always

[Install]
WantedBy=multi-user.target
Enable your application
sudo systemctl enable sonarStart the service!
sudo systemctl start sonarWelldone! In case you want to see if service is running you can :
sudo systemctl status sonarRun it in https with SSL on your domain instead of port 9000
You are good at this stage to use your SonarQube the way it is. If you want a better experience you maybe want to use NGINX and Lets Encrypt and a costume domain! (don’t forget to close port 9000 and open 80 (http) or 443 (https)).
Next we are talking about a community plugin and setup GitHub (public, internal and private) repositories, to scan a pull request and block it in case Quality Gate fails.
Leave a Reply