There are many ways to set up a nice developing environment for typescript. Since I like simplicity and ease of work, let’s setup a TypeScript project that is minimal and easy to work with. Though, It doesn’t mean we need to stick to the defaults; this setup works out of the box, it is pretty much configurable as well.
Note that I personally think jest is an awesome testing framework (of course because it is easy to work with) but if you prefer “mocha, chai, and sinon combination” flavor please be my guest!
We do it stepwise; we start with the absolute basic for running the type script code and testes. Then, gradually we add more kickass features to our project.
I assume you have NodeJS (and npm) installed. otherwise install node
Setup a typescript project
I find it easier to create a git repo (for example on GitHub) and clone it, otherwise create a folder and open it on visual studio code. Open the terminal in vscode ( alternatively you can open any terminal and cd to folder you created).
create/copy a .gitignore file in your root folder that at least contains node_modules you should not push this directory to your repository. You can create a simple one like this (run in terminal):
echo "node_modules" >>.gitignore Lets initialize our project, run in terminal below on a terminal and answer the questions as you wish.
npm initWe add our developments dependencies (-D is equal to –save-dev option of npm)
npm i -D typescript \
@types/node \
nodemon \
ts-node \
@vercel/ncc \
jest \
ts-jest \
@types/jest
Let’s go through the dependencies
typescript : hopefully this one is obvious !
nodemon and ts-node: we can run our typescript code on the fly without needing to compile and run it. nodemon will monitor for any changes in your source as soon as you save the file and automatically restart your server
@vercel/ncc: compiling our project into a single file, together with all its dependencies, so we don’t need the node_module folder on our production server. I talked about it on How to deploy nodeJS app to production (of course you can use tsc –build instead, but ncc is simpler and creates a single compressed file)
jest, ts-jest, and @types/jest: It is our testing framework
Ok open your package.json file and update the scripts section to this:
  "scripts": {
    "start":"nodemon src/index.ts",
    "build": "ncc build src/index.ts -o dist",
    "test": "jest"
  },
Here we decided that starting point of your project/module is src/index.ts file. If you have any other name/path please adjust accordingly. Let’s create that index file for future references:
mkdir src
echo "console.log('Hello World!');" >>./src/index.ts
By setting “scripts” as shown, we setup our basic commands; npm start for running during development, npm run build for creating the distributable package and npm test for running our automated tests.
Note that npm run build is creating a directory called dist .This directory contains a index.js file, that will be the compiled artifact of your project/module. Please add dist to .gitignore too:
echo "dist" >>.gitignoreLet’s do a little bit more, so jest framework works with typescript:
npx tsc --init it will create a tsconfig.json file for you, the default values are good but here you can configure a lot.

Note : please make sure you include all the folders with typescript code towards the end of the file at the include section :
{
 // rest of tsconfig.json
 //... },
  "include": ["src/", "test/"],
  "compileOnSave": false
}
Fix Jest failed to parse a file error
If we stop here, when you write some automates test and run the npm run test or npm t now you probably face this error :
Jest encountered an unexpected token
Jest failed to parse a file. This happens e.g., when your code or its dependencies use non-standard JavaScript syntax, or when Jest is not configured to support
Such syntax. Out of the box Jest supports Babel, which will be used to transform your files into valid JS based on your Babel configuration.
By default, “node_modules” folder is ignored by transformers.
The solution is to create a jest.config.js file by running following command (remember we installed ts-jest earlier) :
npx ts-jest config:inityou get a jest.config.js file with contents that look like this.
module.exports = {
    preset: 'ts-jest',
    testEnvironment: 'node',
    transform: {
      '^.+\\.ts?$': 'ts-jest',
    },
    transformIgnorePatterns: ['<rootDir>/node_modules/'],
  };
Now you are all good for writing typescript code, test it, and build a release of it! But if you want to create an enterprise grade TypeScript/JavaScript environment you have a few more steps.
Note from now steps below are also applicable even to JavaScript projects.
Set your formatting roles using Prettier
We need to have the same formatting rules for all developers based on a generally accepted common style. Prettier -oppose to its name-, is not to make your code more beautiful; it actually make your code kind of ugly (as it put lots of new break lines), but it is very useful. At the beginning you might feel your code is not readable, or ugly but as you get used to Prettier you see the benefit of it.
npm i -D prettier pretty-quickthen add these line to your package.json in script section (don’t forget to add a comma to last line of existing scripts)
"scripts": {
    //... other commands
    "format": "pretty-quick --no-restage",
    "format:staged": "pretty-quick --staged",
    "format:all": "prettier --write .",
    "format-check": "pretty-quick --check"
  },
format: formats any file that is changed since last commit but not will not stage that file even if it is staged (git).
format:staged: pre-commit mode; under this flag only staged files will be formatted, and they will be re-staged after formatting.
format:all: it is useful when someone forgets to format and commits the code. We are doing our best at next steps to prevent that but these things happens.
format-check: it actually checks the new code to be formatted correctly, mostly used in ci process but you can run it locally too.
We need to ignore some files and folders, an important one is dist directory that is being created when we build our project using npm build. so let’s create a .prettierignore file containing dist folder
echo "dist" >>.prettierignorevscode improvements (optional)
To make it easier for your developers you can add this extension to your visual studio code recommendations and settings too!
If not exist, create a directory in your project called .vscode and create a file called extensions.json add this into it:
{
    "recommendations": [
        "esbenp.prettier-vscode"
    ]
}
also create a settings.json in the same .vscode directory and addd these settings to it :
{
    "editor.formatOnPaste": true,
    "editor.formatOnSave": true,
    "editor.formatOnSaveMode": "modificationsIfAvailable",
    "editor.defaultFormatter": "esbenp.prettier-vscode"
}
Now that we are good in formatting let’s make sure we enforce formatting before commiting, that way we always have a well formatted source code.
Enforce code formatting and testing with pre-commit hooks
From the experience, if you ask programmers nicely to always format and run tests before committing, they almost always say “sure”! …and there is no but 😀
Anyway, let’s make sure bad things are not committed using husky. First of all install husky :
npm i -D huskyadd prepare to your scripts on your package.json (don’t forget to add a comma to last line of existing scripts):
   "scripts": {
    //...other scripts
    "prepare": "husky install"
  },
prepare : is a npm life cycle script and it runs on npm install for more please refer to the documentations . Basically, it makes sure that husky is installed.
run prepare once so husky is installed
npm run prepareYou might get the error :
fatal: not a git repository (or any of the parent directories): .git
Error above means that your project is not a git, in this case run git init to create a local git (or clone a repo).
Now that you installed husky (and you got a .husky folder in your project)add the commands we need for our pre-commit hook:
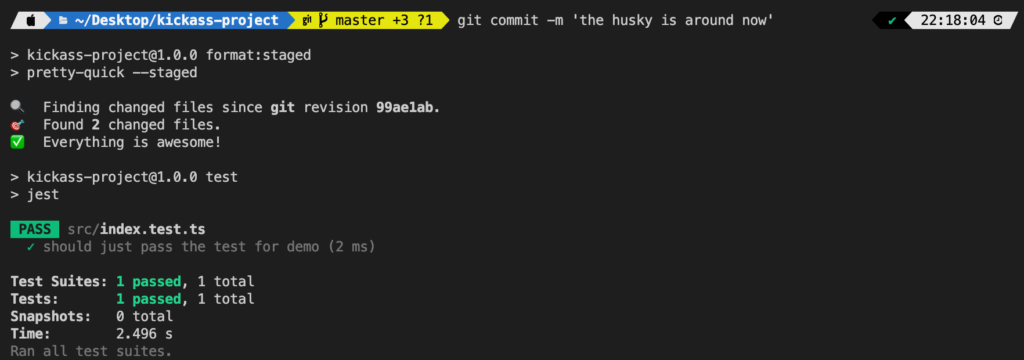
npx husky add .husky/pre-commit "npm run format:staged"
npx husky add .husky/pre-commit "npm test"
It should create a file by the name of pre-commit in a directory named .husky. We added to format our staged files just before committing and restage them (since they are being updated). We also defined a successful test as a condition being able to commit.
From now on whenever you try to commit, all files are being formatted and unit tests run before committing is allowed.
Please commit and push changes including .husky/pre-commit file. Let’s also add the linting functionality next.
Linting Typescript
If you programmed with typescript back in the days, there was a TSLint to do the same as ESLint does for JavaScript. Fortunately, ESLint caught up and now TSLint is deprecated becouse we can use ESLint. So to use ESLint let’s install ESlint and and typescript ESlint plugin on our project :
npm i -D eslint \
@typescript-eslint/eslint-plugin
Create an .eslintrc.js file by running following command and selecting options:
npm init @eslint/configThen you might need to some customizations or add some rules.
Here is an example
module.exports = {
  env: {
    browser: true,
    es2021: true,
  },
  extends: [
    "eslint:recommended",
    "plugin:@typescript-eslint/recommended",
    "plugin:@typescript-eslint/recommended-requiring-type-checking",
    "plugin:@typescript-eslint/strict",
  ],
  parser: "@typescript-eslint/parser",
  parserOptions: {
    tsconfigRootDir: __dirname,
    project: ["./tsconfig.json"],
  },
  plugins: ["@typescript-eslint"],
  rules: {},
};
As before, we need to ignore node_modules and dist. Create an .eslintignore file with these contents:
node_modules
dist
Add lint to scripts to your scripts on your package.json (don’t forget to add a comma to last line of existing scripts) :
  "scripts": {
    //... other commands
    "lint": "eslint . --ext .ts --max-warnings=0"
  }
Setting max-warnings to 0 makes husky stops the commit even if there was some warning. Now you should be able to lint your project manually by running.
npm run lint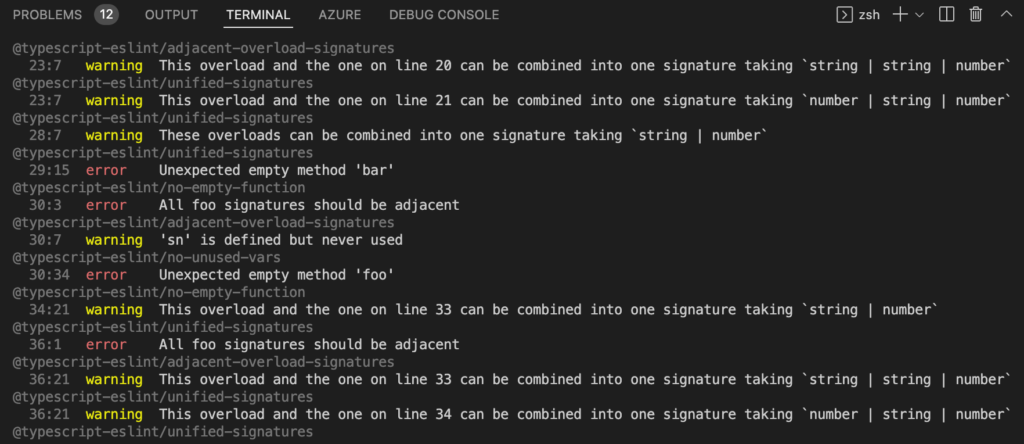
I just intentionally added some smelly code to my project for ESLint to generate image above. Feel free to add this to our pre-commit hooks:
npx husky add .husky/pre-commit "npm run lint"You can of course also add ESLint to your vs code extensions and setting:
for extensions.json
"recommendations": [
        //... other ones
        "dbaeumer.vscode-eslint"
    ]
and for settings.json
{
    //... other ones
    "eslint.alwaysShowStatus": true
}
Now you are good to go and develop some awsome typescript projects! I recommend to read :
Leave a Reply